Overview
Crons are programs that allow you to automatically execute scripts and commands at a given frequency on your site. For example, you can set up a Cron task to delete temporary files every week to free up disk space.
In this article, you will get familiar with viewing and managing your Cron tasks. If your Cron tasks produce a standard output (stdout), you will receive an email to an address that you can define.
Prerequisite
Go to https://mg.n0c.com/en/.
Tips
- We advise you not to run a script every minute during the day, but rather at night.
- If you receive too many emails from Cron tasks, you can disable this feature by adding this at the end of your task: >/dev/null 2>&1
- If you have arguments to give to your script, you must not separate the argument from the file with a “?”. You just have to put a space.
- If your script is causing runtime problems, then it would be better to call it via the php CLI in this form:
php-cli -f /home/USERNAME/public_html/modules/cron.php argument=valeur >/dev/null 2>&1
How to Add and View Cron Tasks
- In N0C, go to Crons.
- Click on the Add button:
- In the Add Cron job window, carefully read the examples in relation to the use:
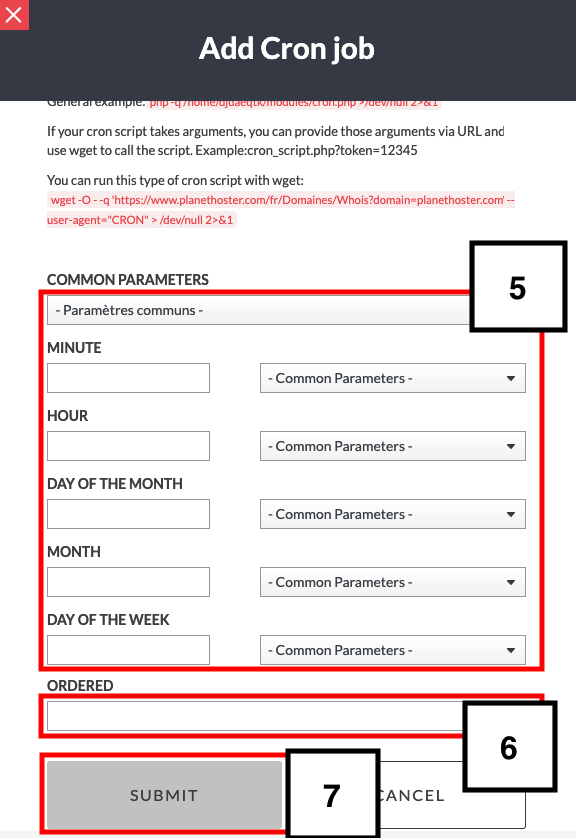
- Choose the frequency of the Cron task in the COMMON PARAMETERS drop-down list:
- Depending on the common setting chosen, enter all the necessary information using any of the drop-down lists MINUTE, HOUR, DAY OF THE MONTH, MONTH, and DAY OF THE WEEK:

- In ORDERED, give the full path from the root to the PHP script (strongly recommended). For example: php -q /home/planzujz/public_html/modules/cron.php >/dev/null 2>&1.
- Click on the SUBMIT button.
- The Cron is then displayed with other COMMANDS.
- Icons are available to Edit (pen) and Delete (trash can) each Cron.
- The Search field is useful when you have several Crons and you want to filter them by keywords:
How to Set the Email Address
You need to define the address to which emails should be sent when your Cron tasks produce a standard output (stdout) such as an “echo” or a script error.
To do this, enter the EMAIL ADDRESS and lick on the Save button.
If you wish to change the email address, click on the Delete button.


