In this article, we will look at how to activate Memcached or Redis on Drupal with LiteSpeed Cache.
Prerequisites
Make sure Composer is installed (if needed, please refer to How to install Composer and PHPMailer).
Enter the following address in your web browser: https://mg.n0c.com/en/.
How to Activate Memcached on Drupal
Preparations for Memcached
Before installing the Memcached module, please follow these instructions:
- Activate Memcached, as explained in How to use Memcached.
- Take note of the Path to Linux sock to establish the link between Memcached and your web application (path /home/N0C_USERNAME/.memcached/memcached.sock), where N0C_USERNAME must be replaced by your real username:

- Confirm that the Memcached server has been started (the Play button is automatically grayed out):

- Go to Languages -> PHP, and activate the MEMCACHE and MEMCACHED extensions, as explained in How to use the PHP interface:

- Please refer to the article How to Use the MG Panel Terminal to connect to the N0C hosting Terminal:

- Change the directory for the Drupal installation folder (here, public_html) by typing:
cd public_htmlInstalling the Memcached Module
You now need to install the Memcached module itself.
- Still using the N0C hosting Terminal and from the public_html working folder, run this command:
composer require drupal/memcache- You will get an installation confirmation:

Activating the Memcached Module
Once you have installed the Memcached module, you need to activate it.
- Log on to Drupal administration at https://yoursite/admin, where yoursite is the name of your website.
- Once in the admin interface, go to Manage -> Extend and check Memcache:

- At the bottom of the page, click on the Install button.
- If the installation is successful, Drupal will return a notification of success.
Configuring Memcache in Drupal
Once the Memcache module has been activated, you need to configure it in Drupal.
- Using N0C’s Terminal or file editor, open the file sites/default/settings.php and put the following code at the end of the file (the code contains the socket path, which must be replaced by the path to the Linux socket noted in the Preparations for Memcached):
$settings['cache']['default'] = 'cache.backend.memcache';// Use UNIX socket instead of IP address and port
$settings['memcache']['servers'] = ['unix:///home/N0C_USERNAME/.memcached/memcached.sock'=> '0']; // Replace with your socket path and use port '0'// Configure cache bins
$settings['memcache']['bins'] = ['default' => 'default','cache' => 'cache','config' => 'config','data' => 'data',];// Key prefix to avoid conflicts
$settings['memcache']['key_prefix'] = 'drupal_';- In the Terminal of the hosting account, check that the cache is working properly by doing a clear cache :
[quuwmcjj@hc-probear-staging public_html]$  ./vendor/bin/drush cache:clear

 Choose a cache to clear [render]:
  [0] drush
  [1] theme-registry
  [2] router
  [3] css-js
  [4] render
  [5] plugin
  [6] bin
  [7] container
  [8] views
 > 0

 [success] 'drush' cache was cleared.
[quuwmcjj@hc-probear-staging public_html]$
This completes the activation of Memcached for Drupal.
How to activate Redis on Drupal
Preparations for Redis
Before installing the Redis module, please follow these instructions.
- Activate Redis, as explained in How to use Redis.
- Take note of the Path to Linux sock to establish the link between Redis and your web application (path /home/N0C_USERNAME/.redis/redis.sock), where N0C_USERNAME must be replaced by your real username:
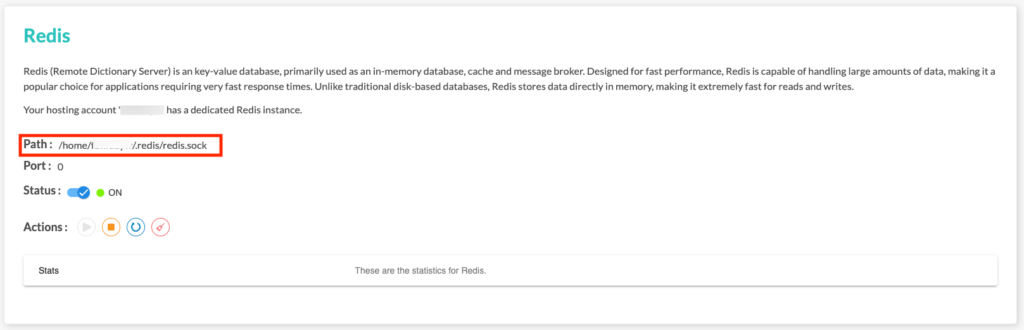
- Confirm that the Redis server has been started (the Play button is automatically grayed out) :

- Go to Languages -> PHP, and activate the REDIS extension:

- Please refer to the article How to Use the MG Panel Terminal to connect to the N0C hosting Terminal:
- Change the directory for the Drupal installation folder (here, public_html) by typing:
cd public_htmlInstalling the Redis module
Now you need to install the Redis module itself.
- Still using the N0C hosting Terminal and from the public_html working folder, run this command:
composer require drupal/redis- You will receive a confirmation of installation:

Activating the Redis Module
After installing the Redis module, you need to activate it.
- Log on to Redis administration at https://yoursite/admin, where yoursite is the name of your website.
- Once in the admin interface, go to List and check Redis:

- Click on the Install button at the bottom of the page.
- If the installation is successful, Drupal will return a notification of success.
Configuring Redis in Drupal
Once the Redis module has been activated, you need to configure it in Drupal.
- Using the Terminal or N0C’s file editor, open the file sites/default/settings.php and put the following code at the end of the file (the code contains the path to the socket, which must be replaced by the path to the Linux socket noted in the Preparations for Redis):
// Redis configuration
$settings['redis.connection']['interface'] = 'PhpRedis'; // Make sure the PhpRedis extension is installed
$settings['redis.connection']['host'] = '/home/N0C_USERNAME/.redis/redis.sock'; // Full path to Unix socket
$settings['redis.connection']['port'] = 0; // Port 0 as this is a Unix socket, no need to specify a port
$settings['redis.connection']['database'] = 0; // Specifies the Redis database to use (default 0) // Configure caching to use Redis
$settings['cache']['default'] = 'cache.backend.redis'; // If you're using Redis for sessions, add this configuration too: $settings['session_storage'] = 'redis'; $settings['redis. session_storage']['interface'] = 'PhpRedis'; $settings['redis.session_storage']['host'] = '/home/quuwmcjj/.redis/redis.sock'; // Unix socket path $settings['redis.session_storage']['port'] = 0; // No port to specify for a Unix socket.- In the Terminal of the hosting account, check that the cache is working properly by doing a clear cache:
[quuwmcjj@hc-probear-staging public_html]$  ./vendor/bin/drush cache:clear

 Choose a cache to clear [render]:
  [0] drush
  [1] theme-registry
  [2] router
  [3] css-js
  [4] render
  [5] plugin
  [6] bin
  [7] container
  [8] views
 > 0

 [success] 'drush' cache was cleared.
[quuwmcjj@hc-probear-staging public_html]$
This completes the activation of Redis for Drupal.