Introduction
The SSL (Secure Sockets Layer) certificate, and the TLS (Transport Layer Security) of which it is the successor, are one of the most important security elements for anyone who owns a website or blog.
This protocol, which will be called “SSL/TLS” for simplicity, allows secure exchanges between your website and Internet users by means of a cryptographic key, which guarantees the confidentiality of personal and professional data at the time they are exchanged. This activates the HTTPS protocol and makes the security padlock appear in the browser’s address bar.
Some users want to manage and install custom SSL Certificates with other providers, such as when they purchase their SSL Certificates from an organization like Comodo.
In this article we will explain how the N0C control panel allows you to manually renew a certificate and install a custom SSL certificate.
In this article, we will consider Let’s Encrypt as the “internal provider” and all other organizations as “external providers”, or “external suppliers”.
Prerequisites
Enter the following address in your web browser: https://mg.n0c.com/en/.
SSL/TLS Interface
- In the Sidebar menu, select Domains > Domain management, and click on the SSL/TLS button for the desired domain (make sure SSL is active, the check mark indicates this):

- The SSL/TLS interface is then displayed:
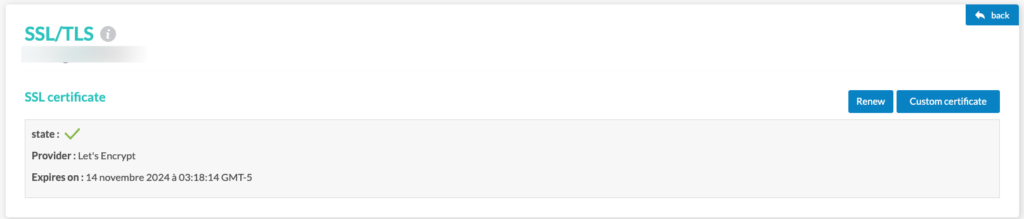
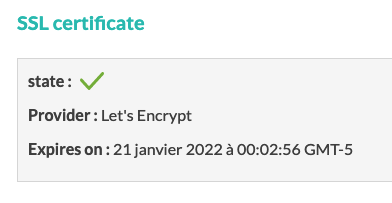
- Note, in particular, the SSL certificate State, the Provider name and the expiration date:

How to Manually Renew an SSL Certificate
Reminder
Again, if the provider is Let’s Encrypt, there is no need to manually renew the SSL certificate of a domain on your hosting, since it is handled automatically.
Here are the steps to follow:
- Click on the SSL/TLS button for the desired domain:
- Click on the Renew button:

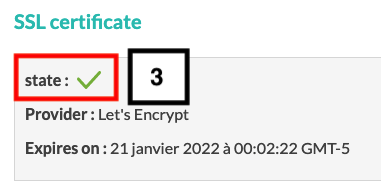
- A “Certificate successfully renewed” message is then displayed and a check mark appears next to the State as well as in the list under Domain Management:
How to Use the CDN Options to Indicate the DNS Configuration
When generating your SSL certificate, the N0C system attempts to detect the DNS configuration of your domain that will facilitate the efficient installation of an SSL/TLS certificate. If the installation does not seem to have worked properly, this may be because you are using a CDN and the system was unable to detect your DNS configuration correctly.
In such circumstances, N0C allows you to specify your DNS configuration. In this way, you can specify that you are using a CDN and, if so, that your “www” subdomain and/or your “mail” subdomain are served by your N0C hosting.
To do so, proceed as follows:
- Open the SSL/TLS interface for the desired domain, as explained above.
- Under CDN at the bottom of the screen, use the checkboxes to specify your DNS configuration.

- Click on the Submit button.
- A check mark should appear next to the state, confirming the successful installation of the SSL/TLS certificate.
How to Set Up a custom SSL Certificate
Roughly speaking, there are 5 steps to setting up a custom SSL certificate:
- Step 1: Provide the information for the CSR generation.
- Step 2: Get your CSR.
- Step 3: Create the certificate request with your provider.
- Step 4: Install the SSL certificate
- Step 5: Test your SSL certificate.
Before proceeding further, it is important to understand that a certificate signing request (CSR) is a block of encoded text (usually in ASN.1 according to the PKCS #10 specification).
Making a certificate signing request means generating a CSR on the server where the SSL certificate will be installed. The CSR contains information that will be included in the SSL certificate, such as the organization name and country. It also contains a public key – the CSR key – that will also be included in the certificate.
If your provider is Let’s Encrypt, you will not need to generate a CSR or a custom SSL certificate.
The SSL/TLS window in N0C is designed to help you install custom SSL certificates step by step. Before we go into detail, we’ll illustrate the process in a flow chart, as it is quite complicated.
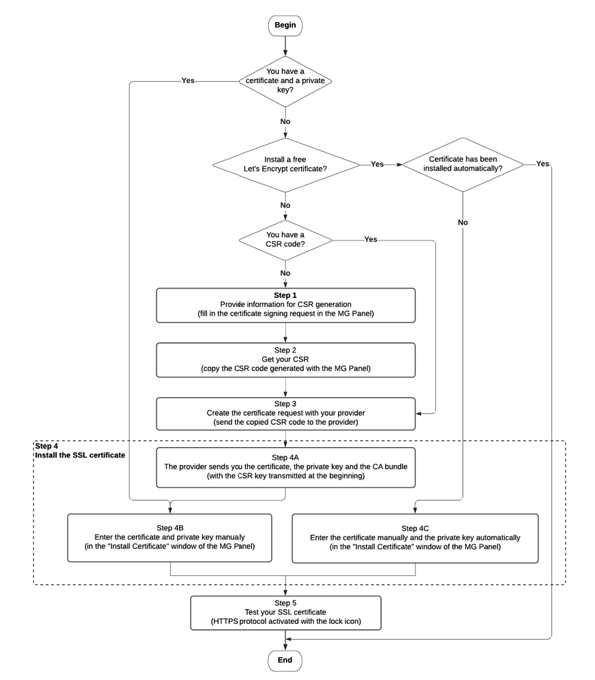
Step 1 — Provide the Information for the CSR Generation
If you already have a certificate and a private key, go directly to step 4B.
Otherwise, if you want to install a free SSL certificate provider with Let’s Encrypt AND the certificate was installed automatically, you do not have to do anything else. On the other hand, if the certificate with Let’s Encrypt was not installed automatically, go to step 4C.
If you have an external supplier AND you have already requested a certificate signing from them, go to step 3.
Procedure for Generating the CSR
In the following steps, please be sure to provide complete and accurate information that will allow to issue a proper CSR. Any errors in the fields of the MG panel may result in delays.
- In the Domain Management window, click on the SSL/TLS button for the desired domain (make sure SSL is active):

- Click on the Custom certificate button:

- Click on the Generate CSR button:

- Provide the required informations:
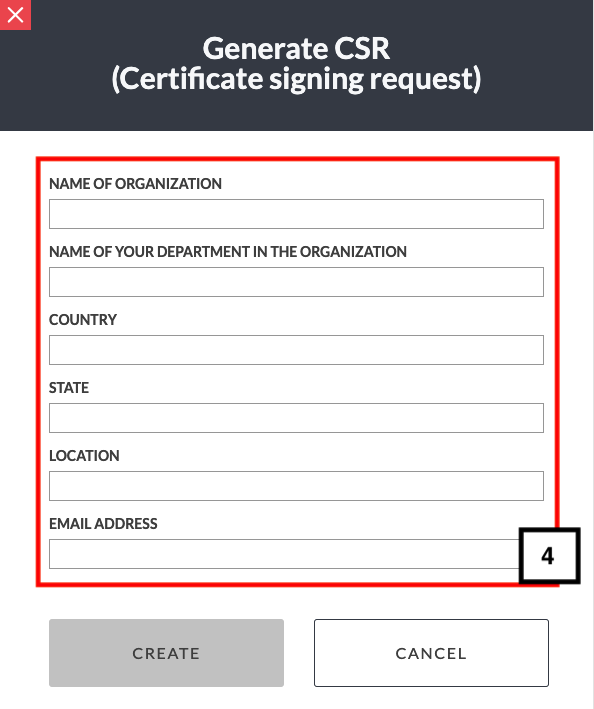
| Field | Code | Instructions |
| NAME OF ORGANIZATION | O | Company Name: Enter the full name (not the trade name or acronym) of your company or organization, preferably in capital letters. Do not forget the suffixes (INC., CORP., etc.). |
| NAME OF YOUR DEPARTMENT IN THE ORGANIZATION | OU | Organisational unit: write the name of the division that deals with the certificate in your company or organisation. We recommend leaving this field blank or, failing that, indicating a generic term such as “IT Department”, in the form of the SIREN code preceded by “0002”. |
| COUNTRY | C | Country: using the two-letter ISO code, indicate FR if your company or organization is based in France, CA for Canada, BE for Belgium, etc., preferably in upper case. |
| STATE | ST | State / Department: in France, indicate the name of the department in which your company or organization has its headquarters (not the number). |
| LOCATION | L | City: Indicate the city where the headquarters of your company or organization is located. |
| EMAIL ADDRESS | EMAIL: Email address of the intermediary within your company or organization who handles the SSL certificate (most often the person in charge of certificate management). |
- Click on the CREATE button:

- Your certificate signing request will appear in the CSR Information list:

- The More details icon allows to display all the information related to your request:

How to Delete a Certificate Signing Request
If for any reason you wish to delete the certificate signing request, simply click on the Delete icon:

Step 2 — Get your CSR
To display the certificate signing request that will be sent to the provider:
- Click on the Show CSR button:

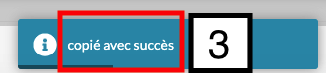
- In the CSR window, click on the Copy button:

- A message is displayed to show that the copy has been made successfully:
Step 3 — Create the Certificate Request with your Provider
Here you need to send the CSR copied in the previous step to your SSL certificate provider.
The most popular providers are IdenTrust, DigiCert Group, Sectigo and Global Sign. Some customers also do business with eNom and Comodo Group, among others.
Your provider will then ask you to pay the fees required to keep the process running.
Step 4 — Install the SSL Certificate
In this step, there are three possibilities. Refer to theflow chart to see which one applies to you.
Step 4A — The supplier sends you the certificate, the private key and the “ca bundle”
After the request has been validated, your provider will send you, often by email, the certificate, the private key and the “ca bundle”:

The provider will also return the CSR key that you originally sent to them. In fact, the certificate created using a particular CSR will only work with the private key that was generated with the CSR. If you lose the private key, the certificate will no longer work.
Step 4B — Enter the certificate and the private key manually
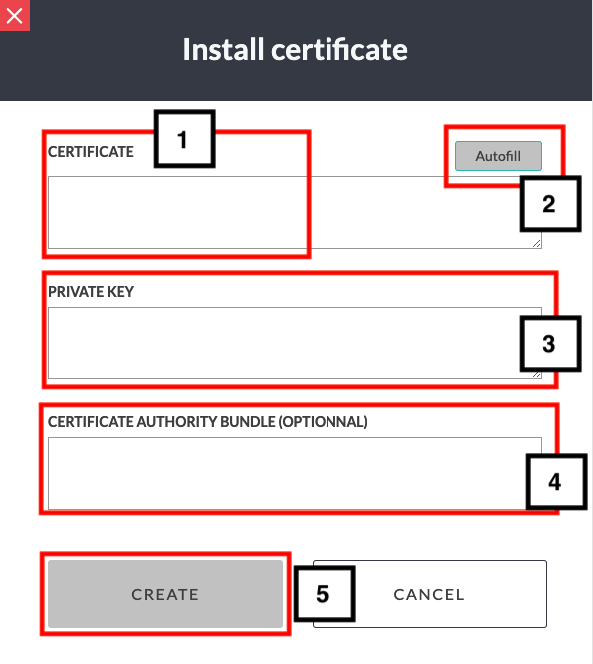
If you want to install an SSL certificate from an external provider, you need to manually enter the CERTIFICATE and PRIVATE KEY provided by them:
- Click on the Install certificate button:

- Copy the CERTIFICATE and PRIVATE KEY received from the provider into the fields of the same name and, if required, fill in the CERTIFICATE AUTHORITY BUNDLE (OPTIONAL) field:

- Click on the CREATE button.
Step 4C — Enter the certificate manually and the private key automatically
If the SSL comes from Let’s Encrypt AND it was not installed automatically:
- Copy the CERTIFICATE into the field with the same name:
- Click on the Autofill button.
- The PRIVATE KEY field will be filled in immediately if you have previously requested the CSR with the Panel MG interface (if not, you must retrieve the certificate and the private key and fill in the fields manually).
- If necessary, fill in the CERTIFICATION AUTHORITY BUNDLE (OPTIONAL) field.
- Click on the CREATE button.
Note
It is always possible to retrieve the private key manually if the CSR was generated with the Panel MG:
- Click on the Get private key button:

- This will open an interface, from which you can copy the private key:

Étape 5 — Test your SSL Certificate
If the certificate installation was successful, you will see that the certificate information will be updated and the chosen provider – Let’s Encrypt or your external provider – will be displayed:
We recommend that you use different web browsers to ensure that HTTPS is enabled and that the padlock icon appears.