Suppose you have an e-mail address called account-email@your-domain. When someone sends an email message to this address, their computer looks up @your-domain in the MX records. MX records are types of DNS records that let the computer know where to deliver the message.
If you want your company to be able to use Gmail with your Google Workspace account, you need to change your domain’s MX records to route your incoming messages to Google’s mail servers. In this article, we will explain how to do this.
However, we recommend that you always consult the up-to-date documentation for Google Workspace directly: https://support.google.com/a/answer/174125?hl=en.
Prerequisites
You must have a Google Workspace account.
Summary of the Procedure
The procedure — which we will explain in detail in this article — is as follows:
- Log in to your domain’s registrar.
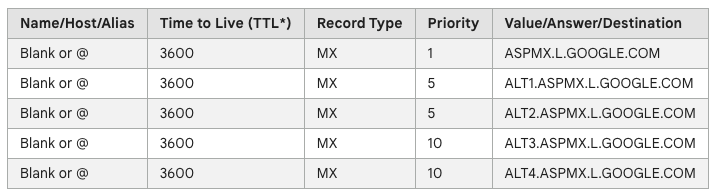
- Delete all existing MX records for your domain routing messages to your current email provider, and then add the five MX records from Google, found in this table:
- Once Google’s MX records are published, Google activates Gmail for your domain.
Using a Domain Name
Enter in your web browser the address https://mg.n0c.com/en/ to connect to the MG Panel. Then :
- In the Sidebar menu, select Domains -> Domain management.
- Click on the DNS button next to the domain whose MX record you wish to modify:

- Click on the Edit icon next to the MX record:

- Delete the existing MX input (TTL, PRIORITY and VALUE):

- By clicking on the Add icon ( + symbol) as many times as necessary, add the 5 MX records of Google (please refer to the table presented in the paragraph Summary of the Procedure). Here is an example of how to enter the first two addresses:

- When the 5 MX addresses have been entered, click on the EDIT button.
- Confirm that the 5 MX addresses have been registered in the DNS Management interface.