As explained in this article, once your email accounts have been created via the MG panel, you can use Outlook software instead of the default email portal we provide1. It can be convenient to receive all your emails in a single interface, which makes managing your emails easier.
In this article, we will explain the procedure for Windows (with classic Outlook and the new Outlook) and Outlook for Mac.
As we will see, you will need not only your login details, but also the details for the MG panel’s email service’s incoming and outgoing servers.
Prerequisites
Enter the following address in your web browser: https://mg.n0c.com/en/.
Make sure you have created your email account, as explained in the article How to Manage Emails Accounts.
Make sure that you have installed Outlook for Windows or for Mac, as applicable.
References
In addition to this article, you can consult these Microsoft support help topics:
- Add an email account to Outlook for Windows.
- Add an email account in Outlook for Mac.
- Change or update email account settings in Outlook for Windows.
- POP, IMAP, and SMTP settings for Outlook.com.
Distinction between IMAP and POP3
During the setup, you will have to choose between IMAP and POP3.
It is important to note that POP3 saves emails on your device, whether it is a computer, tablet, or smartphone, which is an advantage if you want to check your emails offline. However, this lack of synchronization between multiple devices can have unfortunate consequences: for example, if you want to delete an email, you have to delete it on all your devices, not just one.
With IMAP, you won’t have this problem. IMAP keeps your emails on the server, making it easy to share and synchronize them across multiple devices, as long as you have an active Internet connection to read your old emails. That is why we recommend it.
Step 1 — Note the Account Settings
Password
First of all, take note of the password of the email account.
Server
The information is obtained by clicking on the Account params icon in front of the account, as explained in the article How to Manage Emails Accounts:

Ports
You must use the SSL or TLS ports:
- IMAP incoming port (SSL): 993.
- POP3 incoming port (SSL): 995.
- SMTP outgoing port (SSL): 465.
- SMTP outgoing port (TLS): 587.
Step 2 — In Outlook, Identify the Account to be Added and Save its Settings
The procedure differs depending on whether you are using:
If you are unsure whether the classic or new version of Outlook for Windows is installed on your computer, please refer to the following Microsoft assistance’s article: What version of Outlook do I have?.
By default, regardless of whether you are using Windows or Mac, emails in Outlook are synchronized with Microsoft Cloud2. In the case of Apple, the old method of direct synchronization with IMAP is still possible3; however, for Windows, emails are systematically synchronized with Microsoft Cloud.
If you are unsure whether to choose IMAP or POP 3, we recommend choosing IMAP.
Step 2 with Classic Outlook on Windows
- Click on File and on the Add Account button:

- At the command prompt, enter your Email address:
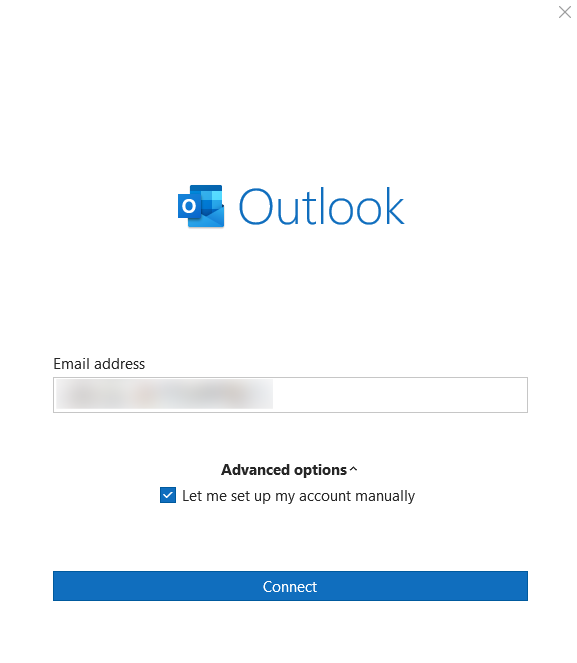
- Click on Advanced options and select Let me set up my account manually.
- Click on the Connect button.
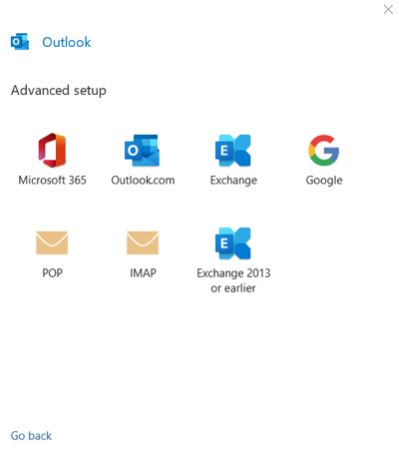
- Click on the IMAP or POP icon, as appropriate:
Protocol for IMAP with Classic Outlook for Windows
If you have chosen IMAP, you will have access to this interface:

- Here you must provide the IMAP Account Settings for incoming and outgoing mail:
- Server and ports.
- Encryption method (SSL/TLS).
- Checkboxes Require logon using Secure Password Authentification (SPA) (mandatory for incoming mail and outgoing mail).
- Click on the Next button and provide the Password to access the account:

- Finally, click on the Connect button.
- You will then get a confirmation that the account has been added, followed by a success message:

- You can then click on the Done button.
Protocol for POP with Classic Outlook for Windows
If you have chosen POP, the approach is similar to IMAP, except that the interfaces differ slightly. Thus, you will have access to this interface:

- You must provide the POP Account Settings there:
- Server and ports for incoming and outgoing mail.
- Checkbox This server requires an encrypted connection (SSL/TLS) (mandatory for incoming mail).
- Encryption method for outgoing mail (SSL/TLS).
- Checkbox Require logon using Secure Password Authentification (SPA) (mandatory for outgoing mail).
- As with IMAP, all you have to do is provide the password and log in, so that a confirmation that the account has been added and a success message are displayed.
Step 2 with New Outlook for Windows
- Click on Home -> Add account:

- At the command prompt, enter your e-mail in Suggested accounts:
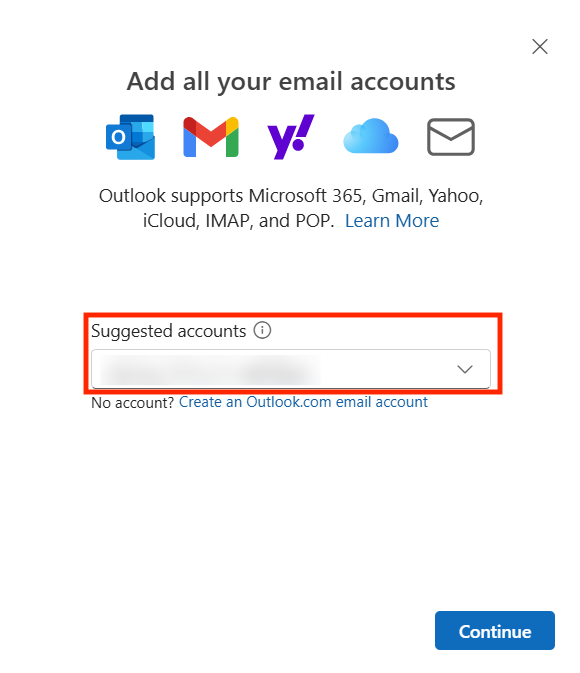
- Click on the Continue button.
- Click on the Select provider button:

- Choose IMAP or POP, as applicable :

Protocole for IMAP with New Outlook
- If you have chosen IMAP, you will open this interface, where you will have to enter the Password and activate the Show more option:

- You have to provide the parameters for incoming emails and outgoing emails (Use recommended settings is selected by default):
- The IMAP Incoming server, the corresponding Port and the Secure connection type (SSL/TLS is recommanded).
- The SMTP Configuration, with the SMTP username and the SMTP password.
- The SMTP Outgoing server, the corresponding Port and the Secure connection type (SSL/TLS is recommanded).
- Click on the Continue button.
- Sync the account and follow the instructions until you have finished.
Protocole for POP with New Outlook for Windows
- If you have chosen POP, you will open this interface, where you will have to enter the Password and activate the Show more option:

- You have to provide the parameters for incoming emails and outgoing emails (Use recommended settings is selected by default):
- The POP Incoming server, the corresponding Port and the Secure connection type (SSL/TLS is recommanded).
- The SMTP Configuration, with the SMTP username and the SMTP password.
- The SMTP Outgoing server, the corresponding Port and the Secure connection type (SSL/TLS is recommanded).
- Click on the Continue button.
- Sync the account and follow the instructions until you have finished.
Step 2 in a Mac Environment
- Open the Outlook app for Mac.
- Click the Add Email Account icon:

- At the command prompt, enter your email address:

- Click on the Continue button:

- Here, you have two options. You can synchronize directly with Microsoft Cloud or use the conventional method.
- If you want to establish a conventional IMAP connection, click Sync directly with IMAP:

- If you want to sync directly with Microsoft Cloud, click the Sign in button:

- In both cases, the rest of the procedure is similar to the Outlook protocole for Windows:

Step 3 — Take a Test
Go to your email interface in the MG panel and send an email to your email address. You should then receive it in Outlook.
Conclusion
In this article, we have seen how to configure an email account from your MG panel in N0C. The procedure consists of three steps:
- Note the account settings.
- In Outlook, identify the account to be added and adjust its settings.
- Perform a test.
- The portal is described in the article How to Manage Emails Accounts. ↩︎
- Synchronizing your account with Microsoft Cloud means that a copy of your email, calendar, and contacts will be synchronized between your email provider and Microsoft’s IMAP proxy servers. ↩︎
- We will explain this in the article. ↩︎