In order to facilitate the management of emails, it can be convenient to receive all emails in a single interface. Therefore, once your email accounts have been created via the MG panel, it is possible to use the Gmail software rather than the email portal that we offer by default.
This will also have the advantage of avoiding redirecting email accounts created on your domain name to Gmail addresses, a practice that is often punished by free email providers like Google and Microsoft.
In this article, we will explain how to set up an email account in Gmail.
Prerequisites
Make sure you have created your email account, as explained in the article How to Manage Emails Accounts.
Step 1 — Note the Account Settings
Password
First of all, take note of the password of the email account.
Server
The information is obtained by clicking on the Account params icon in front of the account, as explained in the article How to Manage Emails Accounts:

Ports
You must use the SSL or TLS ports:
- POP3 incoming port (SSL): 995.
- SMTP outgoing port (SSL): 465.
- SMTP outgoing port (TLS): 587.
Step 2 — Adjust the Synchronization Settings
- Log in to the Gmail account for which you also want to receive emails from your domain on a hosting.
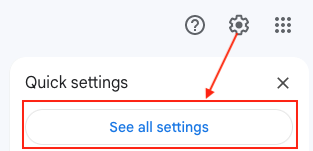
- Click on the gear icon at the top right:

- Click on the See all settings button:

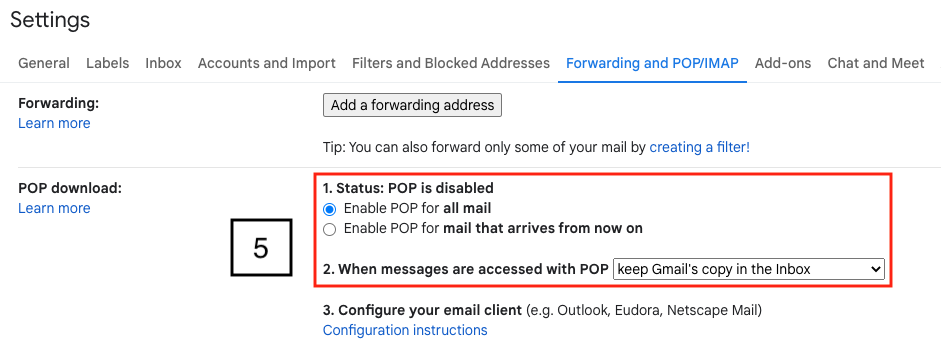
- You will then see an interface appear. In the part named POP download:
- Check the option Enable POP for all mail.
- Also make sure that the drop-down menu When messages are accessed with POP is set to keep Gmail’s copy in the inbox.
- Click on the Save Changes button:

Step 3 — Save the Settings of the Account to be Added in GMail
- Still in GMail Settings, click on the Accounts and Import tab:

- Click on the Add a mail account button:

- At the command prompt, enter your Email address and then click the Next button:

- Select Import emails from my other account (POP3) and then click the Next button:

- You must fill in the connection information, by convention for POP in SSL, whose settings are as follows:
- Username: complete email address.
- Password: password chosen at the time of the creation of the email account.
- POP Server: name of the server.
- Port: 995 (SSL).

- Also check the following options:
- Leave a copy of retrieved message on the server.
- Always use a secure connection (SSL) when retrieving mail.
- Label incoming messages.
- Archive incoming messages (Skip the Inbox).
- As soon as the form for adding an email account is completed, click on the Add Account button.
- The system will then provide you with a confirmation that the operation was successful. Select the option Yes, I want to be able to send mail as (name of your mail account) :

- If you do not want to configure the sending of emails via Gmail immediately, choose the option No.
- Click on the Next button.
- Specify the Name that your correspondents will see when you send them emails:

- Unbox the Treat as alias option to set up as a traditional IMAP/POP account (if you leave it boxed, the system will literally use the registered email address to send as an alias to your Gmail account).
- Click on the Next Step button.
- You need to set up the SMTP connection settings:
- SMTP Server: name of the server.
- Username: complete email address.
- Password: password chosen at the time of the creation of the email account.
- Port : 587 for SMTP with TLS or 465 for SMTP with SSL.

- Choose Secure connection using TLS (recommended) or Secured connection using SSL, as appropriate.
- Click on the Add Account button.
- A success message is displayed and a link is then sent to your email account to confirm your request. You have two options:
- Go to your MG panel email interface and click on the link. OR
- Enter and Verify the confirmation code in the interface.

Step 4 — Take a Test
Go to your email interface in the MG panel and send an email to your email address. You should then receive it in Gmail.