Overview
The File Manager is anergonomic, easy-to-learn file browser that allows to manage hosting files and massive file storage, respectively, from the Local and N0C Storage Web interface.
In the following, we will explain how to use the file manager , limiting ourselves to information for beginners. We will not deal with the management aspects.
Prerequisite
Access to https://mg.n0c.com/en/.
Select Files -> File manager.
Main Page
The file manager contains two separate interfaces:
- Local is used for local storage of hosting files;
- N0C Storage provides access to the new massive storage platform.
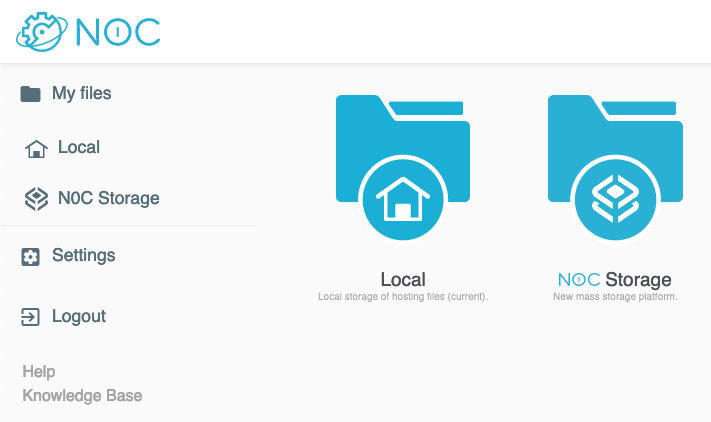
The Local hosting file storage interface is mainly used to store anything that needs to react quickly on your website and needs a high performance SSD, such as your website’s html code and emails.
N0C Storage is a platform designed to store massive files such as archives and items that do not require a high-performance disk (SSD). As such, it can host images, videos and other large files for your website. It is also designed to be used as a CDN to host your static files. Finally, it lets you store your computer files privately in the Private folder.
Accessing the File Manager User Interface
- Select Files -> File manager.
- This opens the main file management interface, with each of the Local and N0C Storage icons providing access to its respective interface:
- The interfaces are also accessible by clicking on Local or N0C Storage on the left.
Distinction between the Public and Private folders
By default, N0C Storage platform contains two folders: the Public folder and the Private folder.

- The public folder contains all the files to be shared, such as the elements of a website. It is accessible through, for example, https://your_domain.com/n0c-storage/.
- The private folder contains files that you do not necessarily want to share. Authentication to access them is handled automatically by the file manager.
Description of the Storage Interfaces
After having clicked on the Local or N0C Storage icons, the interfaces are similar and essentially consists of four areas.

| Description | |
| A | My files: return to the File Manager window. Local ou N0C Storage: access to the storage interface (files and folders are displayed on the right of the screen). New folder and New file: creation of a new folder or file (see the Creating Files and Folders section). Warning: these commands are for the Local storage interface only. Settings: adjustment of the parameters related to the display (see the Profile Settings and Theme section). Logout: quit the file manager . Help: opening of a dialog box with a description of the useful commands to know. Knowledge Base: access to this article. |
| B | Directory. |
| C | Contextual menu to perform operations on the selected file or folder. It is accessible by clicking the right mouse button. |
| D | Icons to perform operations on the selected file or folder. |
| E | Search by keywords window. It is possible to filter file types: images, music, videos and PDF. |
Profile Settings and Theme
Some settings must be adjusted to operate the file manager to your liking.
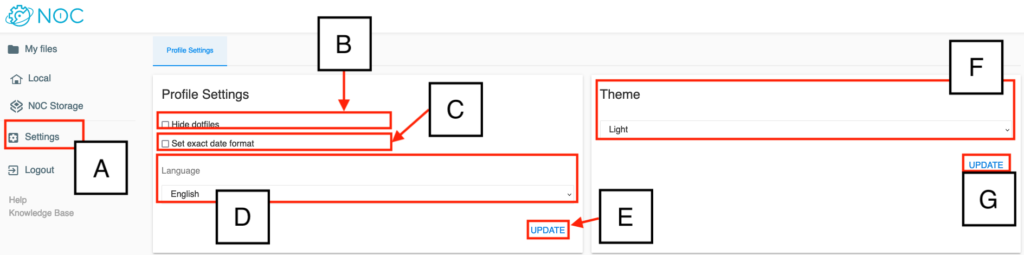
| Description of the fonctions | |
| A | Access to the interface allowing to modify Profile Settings and the Theme. |
| B | Check box to hide dotfiles in the My files area (folder and file directory). |
| C | Check box to set exact date format of items in the My files area (folder and file directory); the format DD:MM:YYYY is used. |
| D | Drop-down list for the choice of the display language (French or English). |
| E | UPDATE button to execute the requested command for the Profile Settings. |
| F | Drop-down list to choose the Theme (Light/white or Dark/black background). |
| G | UPDATE button to run the Theme display. |
Directory
When you choose a folder or a file, the icons and context menu give access to various commands. This is an example of a context menu for a file that has not been archived:
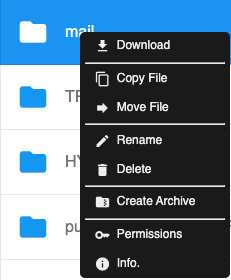
The function of the commands is described in this table :
| Function | Icon or Symbol | |
| Rename | Give another name to a previously selected file or folder. | |
| Copy File | Copy a previously selected file or folder. | |
| Move File | Move a file or folder from one folder to another. | |
| Permissions | Open a window that allows you to manage access permissions to files and folders (see the section about permissions management). | |
| Create Archive | Compress and archive a previously selected file or folder (see the Archiving section). | |
| Delete | Delete a previously selected file or folder. | |
| Toggle Shell | Open the terminal , which gives access to the command line server. | |
| Switch View | Allows you to select up to three display options: – List items one after the other, with their Name, Size and Last Modified date. – Group files and folders together with large icons. – Group files and folders together with very large icons. | |
| Download | Download files from the hosting to the local computer (see Downloading section). | |
| Upload | Upload files from the local computer to the hosting. | |
| Info. | Display various information about the selected file or folder such as Display Name, date of Last Modified, number of Permissions, etc. | |
| Select Multiple | Select multiple files and folders at once. | |
| Extract Archive | Uncompress a previously selected archived file. | |
| Edit File | Edit a selected text file. The code is then displayed on the screen and can be easily modified. |
Permissions Management
The management of file access permissions, as well as writing to and executing files, is done in the Change file/folder permissions interface. The Linux CHMOD (change mode) command is used for this purpose.
- Click on the file or folder whose permissions you want to change.
- Choose Permissions from the context menu or click on the icon with the same name.
- When you do so, the Change file/folder permissions interface opens:

- There are two ways to set permissions:
4.1 Check or uncheck the items under Owner, Group or World.
4.2 Under Permissions, manually set the CHMOD number that corresponds to the desired command. See the Notes on Manual Control section.
- Save by clicking on OK.
Notes on Manual Control
As we have seen, rather than checking or unchecking the options, more advanced users can manually specify the permissions by using the Linux command directly in the Permissions box, as in this example where we have written 754 :

For instance, if you write 754:
- The numbers 7, 5 and 4 represent individually and in order the permissions for the user, the group and the world, in that same order.
- Each number is an addition of the numbers 4, 2, 1 and 0, which define the permissions associated with the user, the group or the public. Thus,
- 4 means « read »;
- 2 means « write »;
- 1 means « execute »; and
- 0 means « no permission ».
Therefore, in our example with the 754 command, 7 is 4+2+1 (read, write, and execute) for the user, 5 is 4+0+1 (read and execute, but do not write) for the group and 4 is 4+0+0 (read, do not write or execute) for the public.
Archiving
An archive is created with the Create Archive command, which opens an interface with the same name.
- Choose the folder where to archive the file or the folder:

- Make sure that the current folder matches the location where you want to save the file or folder:

- If not, click on the right folder.
- Name your archive.
- Choose the extension to give it.
- Click on CREATE ARCHIVE HERE.
Downloading
The download is done in the following way:
- Click on the file or folder to download.
- Click on the Download command.
- If requested, choose the format you want to download by clicking on the corresponding button:
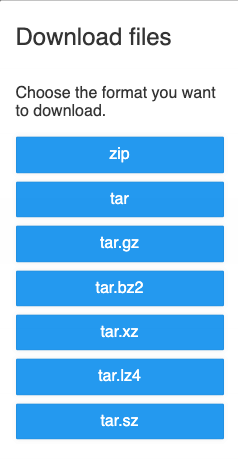
- At the command prompt, specify the directory where to download the file or folder.
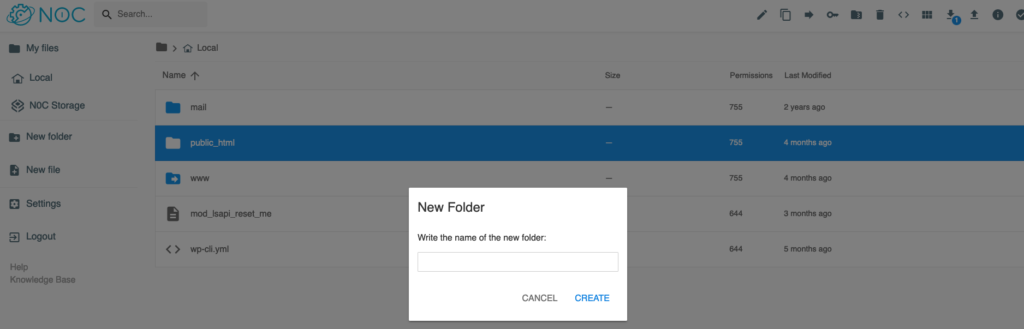
Creating Files and Folders
The approach is similar in both cases.
- Click on Local and then click where you want to create the folder or file (in the root or in a folder).
- Click on New folder or New file, as appropriate.
- In the dialog box, Write the name of the new folder or Write the name of the new file, and click on CREATE.
- If it is a file, you can then enter the information and click on the Save icon:
